Saturday, January 23, 2010

Lathes - Towers and Things


Having decided that bowls were not ideal, I looked at some easier (smaller) work.

These kumihimo bobbins were made from green cherry wood, which was part of some prunings from my prunus sakura tree in July 2008.  They are about 40mm in diameter and about as long (~1.5").

There was no real reason for these other than practice, so I put them aside when done.  By good luck as much as anything else, these turned out well, even though the heartwood runs through all of them.  Over a year later, I made these bobbins into part of the staples of two new shawms which I will write about later.

About this time, the local (SCA) Baron and Baroness made a call for donations of largesse for use as gifts to visitors, etc to the Barony.  I had nothing in hand to offer, but it triggered an idea.

The result is shown here in the form of a pair of candle holders, being a tower on an island surrounded by a moat.

These were made from more old rimu stock left over from house building.  The platters are rather smaller than the bowls mentioned in an earlier post, and turning did not offer any major problems.

 I don't have a photo of the finished holders, showing the gilded towers on the green island surrounded by the blue water, but you can get some of the effect from the photo here, during painting.  In the "water" in the moat was some glitter paint which I initially intended as wavelets, but realised were actually reflections of the stars above.  I realised that I had recreated the content of "Long May She Stand", which is the Baronial anthem song. This made a nice narrative to accompany these presents when they were eventually given to the Baron and Baroness of Ildhafn when they stepped down a couple of years ago.

More Towers

The tower thing has some significance in the local SCA group, so I saw scope for some more work here. Having done turning mostly with well seasoned wood, I turned to using some green wood.

Here are a couple more towers as candlesticks, turned from a freshly pruned cherry branch.  The original branch was about 100mm (4") in diameter.

The turning went so smoothly, like peeling an apple.  And the finish was only about as smooth as a peeled apple.  The wood was too soft to put any finer finish on, so I put them aside to dry and harden.

I knew that shrinkage during drying was going to be a problem, so I bored out the centres to remove the heartwood and perhaps give some space to shrink into.

All for nought. A week later, things had changed as you can see.  The localised shrinkage was more than the wood could bear, and "Crack!".

So, although these turnings were ruined, it was a good learning experience.

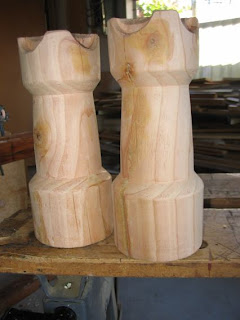
I went back to some old wood for the next set of towers.  These were designed as decorative finials to set on top of the Baronial pavilion.  They are about 300mm high and 100mm across the base.  The wood is a locally grown oregon, with quite a pink tint, that is not very obvious in this photo.

As I found, this is not a great wood for turning.  It has softer and denser regions, and the grain tears quite easily, making it hard to get a particularly fine finish.  Since these towers would be painted, I was not too worried about this.  The photo shows plenty of filler to smooth over the nasty bits.


Once these were painted a garish canary yellow with decorative highlights in black, they were presented to the local Baron and Baroness on their accession during Canterbury Fair in 2009.


 Here they are in action, as it were.


This pretty much ran out that particular tower phase, but it may come back again.  From here, in late 2008, I went on to start making my first shawm, which has been described in the first set of posts to this blog.

Friday, January 22, 2010

Lathe - Early Turnings

For some reason, I started off using my HP lathe by turning bowls on the lathe.  In retrospect, the only reason for doing it was that we needed some basic wooden bowls, and at the time, it seemed like a simple enough thing to do.  These photos all date from March-May 2008.


I used some old rimu timber left over from building our house in 1990.  Being from 200mm planks, these bowls were about 200mm diameter, which was right at the edge of what the lathe is capable of handling.  Even with the new 6:1 gearing, the work would stall at the slightest overload from the chisel.


By dint of having very sharp tools, and making only fine cuts, progress was possible, but rather slow, even with most of the waste wood in the centre chopped out with a chisel.


 The bowl that really went quite well was from a piece of fairly green birch wood. The wood was softer and this turned out well enough and mostly held its shape as the bowl seasoned.  It was good enough to give away to a friend as a present.


 When I came to repeat the turning with the other half of the split birch log some six months later, this had become rather too hard to easily turn and had developed enough of a split to be a problem.  I decided early on that this was not going to work well and binned it.


So, no more bowls on the agenda at the moment.  Until I do something about a lower ratio on the drive pulley, it's just not worth it.

Wednesday, January 20, 2010

HP Lathe - using it

I'm using conventional modern lathe tools - just a basic set until I get a feel for what works well for this style.

It is not the same as a powered lathe, and particular techniques are different. The available power at the spindle is no more than 100W, and the useful speed range is 400-600 rpm. Deep or heavy cuts are not possible; fine cuts are the order of the day. The low power sets limits to the practical size (diameter) of work.

Tools need to be very sharp, especially for seasoned wood. Making sawdust is inefficient except for fine finishing - making long shavings is much better. Someday,  I want to try hook or ring chisels as an alternative to “ordinary” turning chisels. A hook chisel has a loop bent in the end and a bevel ground on the inside of the loop – a bit of a trick to make (see www.robin-wood.co.uk/turnframe.htm). A ring chisel could be easier to make - a short length of steel tube brazed on the end of a shaft mounted in a handle and put a bevel on the inside of one end of the tube for the cutting edge.

There are other techniques to be learned as well: how to operate the treadle for extended periods without falling over, and while keeping the tool steady .

I have been changing the spindle pulley to find a good drive ratio. I found that I didn't need a groove for the drive belt in the flywheel; it sits there without any trouble, as long as the pulley is in the right place.

The original spindle pulley shown here was 50mm diameter, hence giving a drive ratio of 12:1 speed up off the flywheel. This didn't give much torque, meaning lots of belt slippage and stalls - very annoying.
My current pulley is 100mm diameter, hence only 6:1 speed up. The lower spindle speed does not seem to be a big problem, but more torque is good. Now I can easily turn material to 100mm diameter, and can handle 200mm diameter work with some care.

As well changing the pulley size, I can tinker with the travel of the treadle. The initial travel of the crank arm was about 100mm. Increasing this to 150mm travel along with the larger pulley makes for a better feel.


Future plans
Rebuild the bearings on the crank arm for better lubrication and sealing against dirt. The 8mm bolt which is the bearing shaft on the treadle is wearing out rather faster than I expected, although not so fast now that it is mostly in my relatively clean workshop.

Change the drive belt from nylon cord to a more authentic leather belt. This is not so old fashioned as you might think. During my apprenticeship, I have used commercial milling machines dating from well into the 20th Century which had leather drive belts, and which worked quite well. This will probably need a tensioning idler wheel to the drive belt, which should allow better tension control and less belt slippage.

Make another driven centre for the headstock. The first one is a bit inconvenient to fit material onto, sometimes, and the points are not as sharp as they could be.
Make a hollow centre for the tailstock. I will need this for long length-wise drilling of the bores of musical wind instruments. (as you may have noticed from the earlier posts about shawm making, this has already happened).

Do more work with green wood, i.e., fairly unseasoned wood.

Is it a good lathe? Well, sort of, within its inherent limitations.

What would I do differently if I made another one? Make the flywheel heavier by using more layers of lamination. Take more care with the spindle trueness.

Is it fun to use? Oh yes! It's more approachable than a power lathe, because it doesn't spin fast, and it's pretty quiet, and because all the action is at a human scale. And it keeps you warm in a cold winter workshop.

HP Lathe - construction

I needed fairly dense stable timber for the major structural items. I used recycled rimu framing timber – well seasoned, stable, reasonably hard, cheaper than new wood. I cut all the timber and cut the tenons and mortices by hand, but I cheated and dressed the large items with my planer, which also made it easier getting the beams nice and square. I drilled large holes with brace and bit, but used a battery drill for small holes (there were not actually very many of these).


The spindle is made from a 16mm steel bolt running in sealed ball bearings. In period, this would probably have been forged nearly to shape and dressed with a file to final size. The bearings might have been brass or bronze sleeves, or more likely a hard wood such as lignum vitae, greased with tallow. These would have been lossy bearings.

The threaded end of the bolt allows different headstocks to be mounted and unmounted quickly, but is not any sort of period method that I am aware of. Morse tapers are distinctly too modern and too hard to make. A friend Bruce helped me by turning the spindle down on his metalworking lathe, fined down to a firm but not tight fit in the ball races. I tinned the shaft with solder where bearings would be and drifted them into place.


The flywheel shaft is a 12mm bolt also running in ball bearings for convenience. The bearings are inset into the wooden structure and are not very obvious to a casual glance. The flywheel and shaft assembly can be readily removed from the frame for transport or storage. The mounting bush for the flywheel was also turned on Bruce's lathe, and I arc-welded a fastening flange on. My smithing skill is not up to forge welding.

The flywheel consists of three layers of plywood glued together. Plywood was convenient to use and is conceptually sympathetic with period construction in that a period flywheel would have been made by laminating several layers of planks. Smaller planks are more available than large flat sheet, and cross plying improves the strength and stiffness of the flywheel. I took some pains to balance the flywheel, but because of its slow speed, the balance does not need to be particularly good.

I had some doubts about using wood screws to fasten the metal cover plates. However, I found a reference to drawings of screws in a late 15th C manuscript, showing detail of them being used to fasten plates in a matchlock mechanism, so that was OK (see “One Good Turn”, by Witold Rybczynnski – this is a good read; recommended). However, machine screws were not in period use, so I did not use grub screws to attach bushes to shafts - these were locked in place with tapered pins through the shaft.


The threaded end of the spindle was not wonderfully true. I could have gone back and made another spindle being more selective about the parent bolt, or cut threads into a trued shaft, but I was running out of time. My workaround has been to make the driving centres with a compensating offset, noting the position where these run true and locking them in place with a locknut. It's workable enough .


I fastened the beams of the bed to the three uprights with coach bolts. In period, bolts might have been used, although the particular types of bolt would have been different (square head, not hex). However, bolts would have been expensive, and fastening would most likely have been with trenails (wooden pegs or dowels) or snug fitting mortice and tenon joints. I chose to use bolts since this allowed the lathe to be collapsed for storage or transport. All other major joints were inset and mostly dowelled, and fastened with modern adhesives.


The moveable poppet locks in place on the rails with a wedge through it as shown here.

The leather strap through the wedge is a labour saving device to prevent the wedge from popping out onto the floor when tapped on the narrow to free it (which happens often enough to be a nuisance).

I was aiming to show the lathe at a mediaeval fair in early February 2008. My original timeline had some spare time in January for me to get some practice in using it. However, the reality was that I was adding finishing parts and adjusting the running gear right up to the last week, and had virtually no time for practice. So I did my practice during my demonstrations at the fair. No-one seemed to mind - there was lots of interest from many people, and a small queue of other woodworkers keen to have a go. To see some images, go to sg.sca.org.nz/gallery/main.php?g2_itemId=3007, then find your way to page 9 of this album.

Monday, January 4, 2010

HP Lathe - background and design

This is based on an article I wrote for a local human-powered vehicle newsletter (Kiwi HPV).  It's not about any sort of vehicle but it does involve human power. It's about a human-powered wood lathe that I built in 2008.

I had been sort of interested in a wood lathe for some years, but I did not have any specific need, and it was not a burning desire, so nothing had happened. However, I started thinking about making woodwind instruments, which really does require a lathe.  Even so, I was still pretty lukewarm about having another large piece of power machinery in my workshop, taking up space.

Then I was persuaded to make a lathe that didn't have this problem, and one that connected with my interest in early tools and techniques.

Some history
Lathes are old machines. They predate Roman times. I read of person's one categorisation of early lathes into ones that you sit down to use and ones that you stand up to use. The “sit down” type were usually bow lathes where the shaft is directly driven by a bow-string pushed back and forward by the apprentice or other source of cheap labour. The “stand up” type were generally pole lathes where the shaft was directly driven by a cord pulled down by the operator's foot and pulled up by a springy pole acting as a return spring.

The form of a lathe has been well established for many centuries. There is a drawing in the “Mediaeval Housebook” (c.1475) of a screw cutting lathe with all the basic forms: horizontal bed with two rails, and two movable vertical supports for the work.

One of Leonardo da Vinci's notebooks from about 1505 shows a sketch of a lathe with a large flywheel driven directly by a treadle and crank. The shaft speed would have been very slow, and the ~2 meter diameter flywheel would have presented some practical difficulties in stopping and starting quickly. The key aspect of this lathe is that has continuous rotation rather than the alternating forward and backward action of a bow or pole lathe. This makes it useful for more detailed engineering work, turning or swaging or polishing of small metal items, especially if the shaft speed can be increased. Using a belt drive from a treadle-driven or cranked flywheel to a smaller spindle pulley is a way to do this.

Designs
There are plenty of designs around for basic powered wood lathes. Woodworking magazines through to at least the 1960s regularly ran articles on DIY lathes. If you go looking on the web, you can probably find copies of these.

I came across a web-published book by Steve Schmeck on how to build a treadle lathe (www.manytracks.com/publish.htm) (he also does recumbents; surprise!).  “That doesn't look so difficult”, I thought. However, there were a couple of details in the structure I was not so keen on.
Then I came across Roy Underhill's book “The Woodwright's Shop”, where he describes a smallish treadle powered lathe still in current use in his workshop. This had a structure that looked stiffer than Steve Schmeck's design, and I liked it a lot. As well as the look, the material cost was not not very much, so if it turned out to be a dud, I would not have invested much.

I used the dimensions from Steve Schmeck's design, and incorporated the triangulated supports for the flywheel from Roy Underhill's example.

So, my lathe consists of a triangular subframe supporting the flywheel and spindle. The subframe is supported on the left end of a footplate which also mounts the righthand support for the bed. The bed is two horizontal beams fastened to front and rear of the three uprights. A moveable upright supporting the tail stock sits on the beams of the bed and can be clamped in place with a wedge. In principle, this structure should be collapsable for transport or storage.


My intent with this lathe was not particularly to produce an historically accurate example of a lathe from the 16th Century or earlier. I wanted something that captures the much of the "feel" and appearance from that time, and could be shown off at mediaeval re-enactment events, but was also practical and useful in the here and now for doing real work. I also wanted to be able to make it using hand tools as much as possible.

What I have ended with is a representation of a style of lathe that could have been extant in the 16th Century but certainly was in use in the 17th Century. At the same time it has some modern components that are not too obtrusive.

Sunday, January 3, 2010

What's Next?

The first flurry of posts covers my first shawm project through to about March 2009. There's a bit to talk about in a later post.

My next few posts will be about the lathe I used to make the shawm (and other stuff), since it is interesting in itself.

After that, I will talk about some of the things that I have been making with the lathe.

Friday, January 1, 2010

First Shawm - Tuning 2

Having played the gralla, I had a better feel for how the whole reed/staple/pirouette thing should work.  It was time to apply it to the homebuilt version. 

I used the gralla reed for initial testing, and made a pirouette to suit this.  The outer diameter of the pirouette was set by the diameter of the shawm's body, and the length was set by eye and guesswork.

I turned the first pirouette between centres, and didn't do much about turning the cup out. After cutting it off the lathe, I drilled the centreline by eye, reamed it to fit the shawm's staple, and opened out the inside of the pirouette with drills and countersink bits.

Looking at the gralla reed relative to the bagpipe chanter reed, it seemed that a shorter chunky reed was quite a good way to go.


Fellow choir member Lindsay generously donated a batch of pre-loved/run-in/used bassoon reeds from her stock, and I was in business.


The binding on the bassoon reeds is rather chubbier than on the gralla reed, so I had to enlarge the inside of the pirouette to allow for this, which was the work of a few minutes with the drill press and an 11mm drill .

Here's a close up of a reed and pirouette on the shawm.


The shawm, now with a full octave of finger holes, tuned with a bassoon reed.
The hole spacings are based on the limits of what my fingers can reach.


Close up views of the central finger holes. 
Older filled-in holes are also very visible.
The chamfering around each of the holes serves two purposes:

  • it helps fingers locate the holes and seal them properly and quickly,
  • it removes the tatty finish around the holes caused by drilling and filing them to size. 

The downside of using rimu for the instrument is that it is not a particularly fine grained wood, so a clean finish around holes requires some attention.

Placing these holes went quite quickly.  I did this octave set of holes in about two hours.  However, as holes are added further up the body, these affect the tuning and intonation of the lower holes, so I need to work back down the row making adjustments.  This will not be anywhere near so fast.

The to-do list now stands at:
  • adjust the tuning, especially the E and the A.
  • do a lot more Practice!
  • do some fine shaping of the inside of the pirouette, since the binding of the reed is still jamming, which affects the playing action.
  • consider refinishing the outer surface and varnishing it (quick and dirty with polyurethane, I'm afraid. The period finish will be on the next one).
  • sealing the inside of the bore (thinned down varnish on a pull-through cloth, or something similar).

Sidebar - Playing a Gralla

While at Canterbury Faire, in early February, I had a stroke of good fortune.  Also at the Faire was another hard-core musician, Ignatius of Castelburn, who  generously loaned me his gralla seca, which is a traditional Catalan oboe.  This one was made by Francesc Sans of Sans Luthier in Spain, and it has a lot of presence when it is played.

I used it for a couple of  dance sessions at the Faire, which was fun.  However, I found that the reed tended to work loose while I was playing, which was a pain, obviously.  This was probably largely due to my lack of technique, but I felt that there was room for general improvement.

The improvement would take the form of a pirouette surrounding the reed. The pirouette is used to locate the player's lips relative to the instrument and avoid the need to lip the reed all the time.


Here's a piece of cherry wood being roughed out for the pirouette. 

This piece dates from about October last year, and has seasoned quite well, without cracking. It has a rather finer grain than the rimu, and gives a smoother finish more readily.  I'm not worrying about colour matching just yet.


And here it is, coming off the lathe. 

I cut the blank end off, and drilled out the centre plug, and tapered the hole to fit the staple of the gralla.

The pirouette, polished up and lacquered, fitted on the staple, ready for the reed.


The pirouette and reed fitted to the gralla. 
Although it may not be obvious here, the gralla is quite short; about 300mm, and is pitched in G rather than C.

This has made a real improvement to the ease of playing the gralla without dislodging the reed, although the reed can still be lipped if desired.

In parallel with making this pirouette, I was making a pirouette for the shawm, as you see if you read on.

First Shawm - Tuning 1

Once I had the bagpipe reed fitted and kinda working, I marked out the expected hole positions according to Trevor Robinson's plan.

I cautiously formed the sound holes in the foot section to the correct diameter, and then the tuning holes at the end of the upper section (these are on the side of the body so can't be seen in this photo. I started at 4mm diameter, and cautiously opened them up, testing all the while for a C. In the end, I had to enlarge these holes well past the Robinson specification to get to C, and even then I had to push it a bit to be on pitch.

And so it went, up the scale. For each hole, I had to open the diameter beyond the plan, which suggests that the holes should have been placed further up. After a few holes, I started drilling them further north than the original plan. By this process, I made it from C to G without too much bother.


Here's the shawm part way through tuning (at A). I put on a skin of varnish to protect the wood while I was handling it so much, hence the darker colour.

At this point, the holes are: four for the right hand fingers, and the lowest one of the three left hand holes.

Already, you can see a closed off hole beween the second and third holes.


A little further on, and I have become quite disenchanted with the state of the lower holes, so I have closed them off.

Blocking off was easy enough: I stuffed a plastic bag up the bore to block the holes from the inside, and filled them with woodfiller. Once this hardened, I sanded the outside flush with the surface, and buffed the inside bore to a reasonable state.

Noting that the original holes were all on the flat side, I sited some new holes at convenient finger spacings and angles, not far down the body. However, I was finding it harder and harder to get a consistent tone from the reed, and the instrument as a whole seemed to want to jump up the octave, even for very low volumes.

It seemed to me that I had to revisit the whole reed and pirouette thing, and get a consistent operation.

All this would be after Canterbury Faire!

I decided to make a clean sweep of it and start the tuning again; I filled in all the finger holes.

First Shawm - About Reeds

Up to this point, everything has been relatively straightforward woodworking. However, before I could go much further, the matter of the reed had be resolved, and I was rather out of my comfort zone.

Trevor Robinson suggests that a modern oboe reed could work, or that a bagpipe reed can be experimented with. I already knew that a bassoon reed did work, but guessed that it might be a bit "heavyweight" to be ideal for a soprano instrument. Also, these reeds are quite expensive, relative to the rest of the shawm.

So I splashed out $30 or so for an oboe reed and fitted it to the shawn. What a disappointment! All I could get was a high squeak, that was not affected by the presence or absence of the shawm tube. I surmised that there was some acoustic mismatch between the reed assembly and the shawn bore that prevented the shawm resonance from controlling the reed.


These are the reeds that I tried. From left these are:

  • Modern oboe reed - not very effective.
  • Bagpipe chanter reed - serviceable, and relatively cheap.
  • Bassoon reed - quite a good sound, but not at all cheap!

On the extreme right is the staple I made to take the bassoon reed. The body is an offcut from a brass door hinge, rounded down in the drill-press. There is a brass washer and a tapered tube of copper shim soldered to the end of it.


A close up of the reeds from the other end.

The oboe reed on the left has an inbuilt staple, but there is too much transition between the internal tube and the inside of the shawm, which is about the diameter of the cork outer.

The bagpipe reed has a small internal staple.

The bassoon reed on the right has no internal staple, but seats on the tapered tube of the staple when it is fitted in the shawm.

Budgetary constraints recommended that the the bagpipe reed should be made to work if at all possible.


Here's another staple I made to suit this bagpipe chanter reed. Not a wonderful shot of the inside of the new staple, but it sort of shows the fairly uniform taper inward to where the reed sits. This view is looking up the staple from the inside of the shawm toward the reed.


And here is the bagpipe reed fitted to the staple.

The body of the staple has some clear tape wrapped around it to make it fit the body of the shawm. This is not very satisfactory for repeated insertion and removal, and might be replaced with some nice arrangement of cork, one day.


The reed and staple fitted to the shawm.

And so to tuning it!

What is all this?

This flurry of posts is me transferring some old material to this blog before moving onto newer works.
Alignment of images and text is sometimes not as polished as it could be, but it's adequate.

First Shawm - Putting it together


The foot section is now glued to the bell. Here is the whole foot section back on the lathe to be shaped down to final form.

Not visible here, but an offcut from making the foot section is a nice fit inside the bell for mounting it on the driven centre.

Despite all the care, the whole assembly was not altogether running true. I chose not to retrue it since this might have been not successful in a big way. I confined myself to cleaning up the obvious irregularities around the glued joint, and did most of the finishing by hand with a rasp and sandpaper.


The final step for the foot section: reaming out the 6mm central hole to the right size. I opened the bore to about 15mm with various twist drills, then worked up slowly from there to the final 27mm diameter with the reamer.

The shaped foot section is harder to grip safely than a rectangular blank section. Here I have made some semi-circular jaws and used these to clamp the foot, which has a leather wrapping to protect the surface.


Some waxed thread goes around the tenon on the upper section and it's a nice snuggish fit into the socket of the foot section.


In one piece!

I have not drilled any of the tuning holes yet. However, with a bassoon reed stuffed in the end, I can make an A flat, and a flattish octave above that, as you can hear from the recording. The experienced bassoon player in our household can extract an E flat from it, which is more in keeping of the final tuning.

I'm sortta pretty pleased with the overall result so far. The tuning will be the really interesting step, once I have sorted the proper reed and pirouette mounting.

First Shawm - the Bell!


The bell section forms the bottom 100mm of the shawm.  This will be attached to a foot section about 135mm long, which will slide onto the upper part of the body which has been described in the previous posts.

I didn't have a block of wood large enough to make the bell, so I glued two chunks of rimu together as seen here (note to readers elsewhere in the world: rimu is a timber much used locally for medium quality furniture and house construction - see http://en.wikipedia.org/wiki/Dacrydium_cupressinum for more).
As it was, this block was still not quite large enough, and I had to glue some more pieces on here and there.


The bell blank mounted on a faceplate to allow end turning.

I bored a 25mm hole down the axis, with a brace and bit, using the hollow centre as a guide.  It didn't matter whether this was exactly centred but it helped.  Then I drilled two sets of holes with an electric drill, one set in a ring at 61mm diameter to depth 25mm and the other set in a ring at 36mm diameter to 50mm depth.  Taking the faceplate off the lathe, I chiselled out  much of the unwanted wood from the inside of the bell.

Back on the lathe, I did the rough shaping of inside and outside of the bell as seen here.


Checking the internal contour of the bell against a polyester template, printed  actual size from the CAD package.

The original hole I bored to start the turning was not precisely centred.

Here is a small block of wood glued into the base of the bell, and the actual centre re-established by stabbing it with the fixed centre.

I drilled through this new centre with a small drill, providing a guide hole for the next step.

Drilling the socket for the foot section to be glued to the bell, using the centred guide hole from the previous step.


Here is the foot section, with the socket for the upper section cut. The outside is being roughed down to approximate size.

I was not game to cut this socket too vigorously in case I made it too large.  Reaming it later is a safer bet for a good fit.
Here's a detail of the driven centre fitted to the new central hole, filled with a small piece of dowel.

Here's a short reamer I made to tidy the socket on the foot section up to the right internal size.  The cutting edge is the piece of hacksaw blade protruding slightly from the circumference.

First Shawm - Reaming and shaping the body

Another one of the interesting/exciting/challenging things about a shawm is that the internal bore is tapered. It starts at the reed end at about 6mm diameter, and widens to about 25mm diameter at the point where it flares out into the bell. This requires a tapered reamer of some kind to open the cylindrical bore out into a conical bore in a controlled fashion.

A conical reamer would be great, but this requires a metalworking lathe which I don't have.

Another ruse is to turn a conical former of the right size in wood and fit a cutting blade into a lengthwise slot. This works well enough for larger diameters, but not for the small diameter end of the bore (down to 6mm).

A third way is to cut a flat metal strip to the correct tapered outline, and form two cutting edges on the opposite sides. This is very doable, and this is what I did.


Here are two reamers I made for this shawm.

The upper one is in 2.5mm steel, and the lower one in 4.5mm steel. It's only mild steel but this is quite adequate for low speed cutting (scraping, really) of wood. Some careful work with an angle grinder and hand file had these ready to go quite quickly.

The thin reamer tapers down to 6mm, while the thicker one starts at about 14mm.


I had visions of the reaming process going awry due to inadequate control of the reamer, but it turned out pleasingly straightforward.  The trick is to not rush or force the reamer beyond its strength.  The 2.5mm steel was stiffer than I had expected, but I managed to twist it once, by being too vigorous.

I used the narrow reamer to open out the bore sufficiently to start the wider reamer in the open end.

Once the wider reamer had cut the bulk of the bore as in the next picture, the narrow reamer went in again to finish off.  In the end only fine dust was coming out which was encouraging.


Here is the wide reamer being used .  The black line on the reamer near the workpiece marks the limit of how far it should enter.

I was pleasantly surprised at the quality of the finished surface in the bore. It could stand a little buffing but was essentially smooth and even.

The final opening was not altogether circular and not altogether central (see the image further down this page).
Improvements for next time:
  • fit a proper two-handed handle to each reamer, which will allow better lateral control and more even rotation.
  • do the reaming in a vertical axis, which with the better handle will allow better lateral control.


Since the bore was not centred on the original driven centre locating hole, I made an adapter to provide a new centre.  The dowel is turned down to be an interference fit in the 6mm bore in the end of the workpiece.

This wasn't a total success since it flexed slightly under the side load of the cutting chisels, so centrality suffered a bit.


Here is the workpiece approximately shaved down to size based on the actual bore axis.The middle section is being rounded down.  I used a drawknife to round it down further while mounted in the lathe, after this photo was taken.  This was a faster removal of material than turning it off.

With a powered lathe, this may not be the case.

Note the adapter blocks at each endof the workpiece, to line up with the actual bore axis. This was not wonderfully rigid; the process needs improving for next time.


Here is the shaped and smoothed top section of the shawm.

This is about 70% of the overall length. The pirouette and reed will be in the left hand end and the bell and foot section will slide on to the rebated tenon section on the right hand end.


The lower end of the top section.

Note the multi-lobal shape of the bore and being slightly off centre.  The lobes could be reduced by better control of the reamer as discussed above. The centrality can be improved by better use of the adaptor block or some different technique.

Neither of these aspects is fatal, I think. Final finishing of the instrument will probably allow any effects to be compensated.